Tree command recursively lists files and folders in a tree structure. This provides an excellent overview of what a folder contains. On Windows tree command is available by default. However, there is no default tree command available on Linux and Mac. In this article, I’ll share steps to use tree command on Mac, Linux, and Windows.
Table of Contents
Tree Command for Mac
On Mac, the tree command is not available by default. There are two options:
- Install
treetool usingbrew - Use
findcommand with analias
Option 1: Install tree Tool using brew
# Install using brew
brew install tree

# Run the tree command
tree
Here is an example:

Option 2: Use find Command with an Alias
Alternatively, use the following find command to display files and folders in a tree view. For faster access, add this command as an alias to either ~/.bashrc (for BASH) or ~./zshrc (for ZSH) depending on which shell you are using. I prefer this option since there is no additional installation required.
# Command to display tree view
find . -print | sed -e 's;[^/]*/;|____;g;s;____|; |;g'

# Add the above as an alias either in ~/.bashrc or ~/.zshrc depending on the shell you use
alias tree="find . -print | sed -e 's;[^/]*/;|____;g;s;____|; |;g'"

# Run the tree command
tree
Tree Command for Linux
Like Mac, Linux also does not come with a default tree command. Install tree before using it.
# Install using yum
yum install tree

# Install using apt
apt-get install tree

# Run the tree command in current directory
tree

# Run the tree command in a specified directory
tree folder_name
Here is an example:

Tree Command for Windows
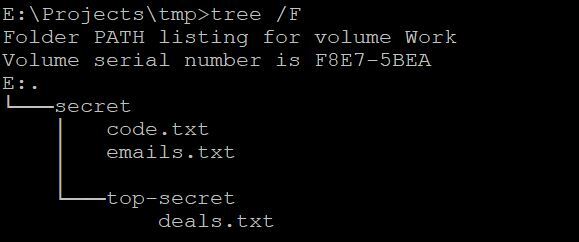
Windows comes with a default tree command. In a command prompt, type the command tree to list files and folders in the tree view.
# Run the tree command with /F option to include files
tree /F
Here is an example:

Be The First
Join our list to get instant access to new articles and weekly newsletter.


[…] You may also use tree command for this purpose. See more details in this article View Files in Tree Structure for Mac, Linux and Windows. […]